Sunday, March 27, 2011

Graffiti


Someone pasted some pictures onto the walls of a rundown gas station near my house. I walked over their with my friend and we filmed and took a few pictures.

Obey, Andre, Man 02

Obey, Andre, Man 01

Obey, Andre, Woman 03

Obey, Andre, Woman 02

Obey, Andre, Woman 01

The video that appears in the clip is highly edited. If you want the complete footage, just email me at jbread89@hotmail.com and I'll find some way of making it available.


All images embedded on this post are Attribution-NonCommercial-ShareAlike Creative Commons licensed.

Friday, October 8, 2010

Guitar Hero Controller Synth


This is a modified Playstation 2 Guitar Hero controller. Just about everything is left the same with only slight modifications to the actual controller. The circuit that drives the oscillator is based on the LM386 amplifier chip. Here's the schematic. You can download the full image here.

Controller Schematic

In this image, I actually inverted the resistors. The 50k ohm should be at the top and the 10k ohm should be at the bottom. That way, the lower tone is connected to the higher up keys and the higher tone is connected to the bottom keys, the way a real guitar is. Here is another picture which corrects this.

Controller Key Layout

Because of this layout, you still get a low tone if you strum without pressing a key because the potentiometer is also a resistor. When one key is pressed at a time, you will get a different tone but if you press two or more at a time, you will get a high tone. This is because the resistors will be connected in parallel. Here are a few photos of the key board along with the resistor board.

Controller Keys

Keys (Full View)

Resistor Key Tuner

Resistor Tuner (Bottom)

Resistor and Pot

The strum bar was a little tricky. I wanted to use an entirely different board because I was worried that the components on the board would cause some kind of short circuit. I was unable to find a board big enough to fit across the strum bar so I ended up using the original board. I had to cut several traces to ensure the current from the square wave circuit wouldn't run anywhere else.

Strum Bar Mod

The switches are connected to the output jack. I also accidentally inverted the wiring here as well. I connected the Ground to the switches and the switches to ground rather than the signal to the output. This is okay if you use it on a small amp but if you using a real guitar amp, the Ground on the amp will replace the ground on the circuit, which would give a constant signal, and bypass the switches for the strum bar.

If you connect the output signal to the switches (like I was supposed to) you effectively disconnect the signal from the amp until the switches are pressed using the strum bar.

I hope this helps you out if you decide to make this. If you need any help or clarifications email me at adimwit@hotmail.com. Thanks.


All images embedded on this post are Attribution-NonCommercial-ShareAlike Creative Commons licensed.

Tuesday, September 28, 2010

Stand Off


This took me one long weekend to complete. I used a digital camera that shot HD stills and used the HD video plug-ins for Windows Movie Maker. 

The filming and editing process for this video was fairly easy but I ran into a lot of problems making the first-person binocular view scene. I had used a green screen for the black binocular scope and filmed the video in full zoom. This worked great in theory but I had trouble formating the videos to work properly. The video only filmed in 640, but the pictures were in 1920 (or something like that). So I had to try to format them to the same size. I spent hours trying to do this but each time the video was corrupted or couldn't convert. I assume it was because of the codecs, which hadn't dawned on me until just now (idiot). Eventually, I just reformatted the black green screen image and used that over the 640 film, which is why in that scene the binocular view looks really small.

Anyway, I hope you enjoyed the little short.

Square Wave Oscillator


This is a square wave oscillator (digital, like 8-bit music). It's based around the LM386 amplifier I.C., which is what the mini guitar amplifier was based on. It has a simple power switch connected to the battery, a potentiometer for adjusting the tone, and a normally closed momentary switch. The momentary switch is connected to the signal output. It's normally closed so when you press it, the signal is cut off but when you release it, the signal passes through again to your amplifier. This can create some cool sounds.

I have the schematic embedded below. Feel free to download it here. There is detailed instructable I wrote here on how exactly to build the circuit.

LM386 Oscillator Schem1

This is a diagram showing the components wired to the I.C. The red x's indicate places where the wires don't connect and the black dots indicate connections. Feel free to download the image here.

LM386 Oscillator Schem2

This second video contains another square wave oscillator but with keys to jump to different tones and a potentiometer to adjust the overall tone. The keys are actually normally closed momentary switches. A resistor is connected to each switch so when it is pressed, it generates a tone. It's hard to explain here so I'll try to explain it later or in a video.

Creative Commons License
Square Wave with Keys by Justin Bread is licensed under a Creative Commons Attribution-NonCommercial-ShareAlike 3.0 Unported License.


Both images embedded on this post are Attribution-NonCommercial Creative Commons licensed.

Unpublished Material


A short collection of stop-motion projects which were never published. These projects were eventually abandoned for whatever reason. The date they were created ranges from 2004 to 2009.

iPod Battery Replacement


I had purchased a 60 GB iPod at a yard sale. It wouldn't turn on and it wouldn't hold a charge when it was connected to a USB port. With a firewire cable, it would charge but only run for 30 minutes as opposed to 8 hours. So I bought a battery for it online. This was a short clip showing how to replace the battery.

The iPod also had a couple other problems. The click wheel wouldn't work, so I had to replace that as well. After that, it worked great but I hated the iPod interface. After a couple days, I put Rockbox on their.

Rockbox was great. There were tons of features added to the iPod. You can record audio, run tons of audio formats, even a few video formats and lots of games.

Eventually, the five year old hard drive burned out so I shelved the iPod. I could buy a new harddrive but they're about $90 bucks so I'll wait awhile.

Friday, January 29, 2010

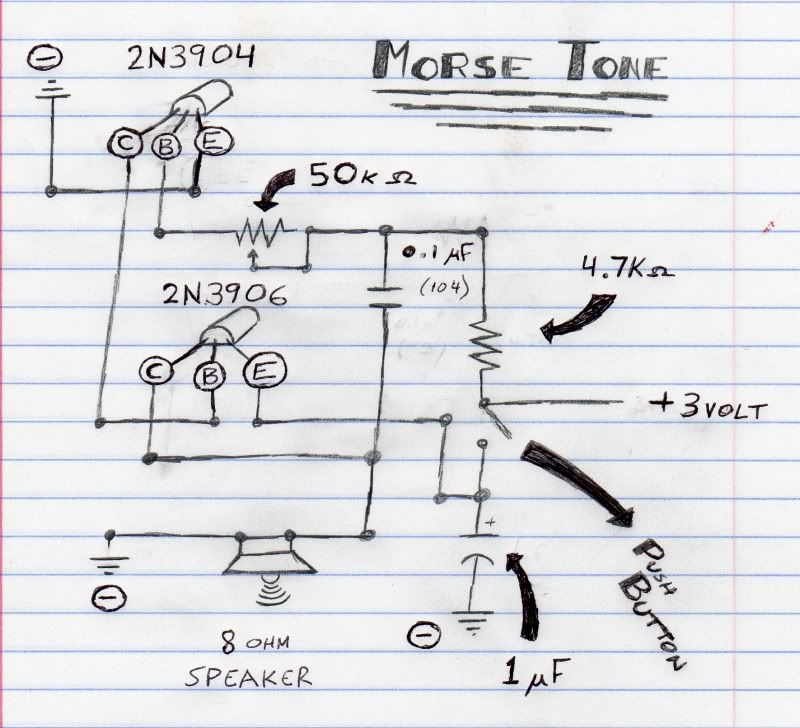
Morse Tone Generator


I slapped this together in about an hour or so. I found it on Instructables by user frickelkram.

http://www.instructables.com/id/Morse-tone-generator-low-power-CW-beeper/

It's a cool setup with some transistors in there to keep the power usage low. I never used transistors before so I had a little trouble figuring out how to wire it all up. Once I got it, I drew up a schematic that made it all kind of obvious.


The picture shows how the pins are laid out (double check your datasheet to see if it matches). The schematic symbol kind of confused me a little. So I drew it as my transistors looked just so I could get it straight.

Creative Commons License

Sherman Tank in HD


I made a short stop-motion video to test out the HD capabilities of my webcam. It does pretty good but I had a problem finding a (FREE) video editor to maintain the HD quality. I kind of stumbles onto this website:

http://www.bauer-power.net/2009/04/create-hd-videos-in-windows-movie-maker.html

This guy had the same dilemma as me so he created a plugin for Windows Movie Maker that would allow it to export the files into their final HD format. He included four HD resolutions. Just download, open and drag the plugins to your WMM directory/plugin folder.

Anyway, I'll probably upload the video files for download later in the week (or today).

Sunday, January 24, 2010

Tank Misadventures


This was just a short clip I made using my new Logitech C600 webcam. Since it was so short I made all the project files available at Megaupload:

http://www.megaupload.com/?d=QVRGWUMR


Creative Commons License

Wednesday, July 29, 2009

Noise Device


This was device I made largely based on the Solar Theremin schematic found on the Popular Science website. Instead of using two Photoresistors, I used two 5 kOhm variable resistors. You just play with the two knobs to adjust the tones.

Click the here to go to the site for a parts list and instructions.

Wednesday, July 22, 2009

A Couple Things . . .

. . . The Clay War was removed by YouTube because Warner Music Group claimed copyright infringement on the audio track which was The Ride of The Valkyries. I was able to find a public domain copy of Die Valkyrie which is essentially the same. I can re-edit it with the new track but I might have to do without sound effects.

. . . Warner Music Group also claimed infringement on Stopmotion Flight Tutorial so the audio has been disabled. I can probably redo the audio without much of a problem.

Wednesday, June 24, 2009

Playlist


01 This Ain’t No Picnic Minutemen

02 Friend of the Devil Garteful Dead cover by Rob McNurlin

03 Corona Minutemen cover by Calexico

04 Time of Your Song Matisyahu

05 Imagine John Lennon cover featuring George Bush

06 Maple Leaf Rag Scott Joplin

07 Deep River Blues Doc Watson cover by Adam Levinson

08 The Revolution Will Not Be Televised Gil-Scott Heron

09 The Lonesome Death of Hattie Carroll Bob Dylan cover by Rob McNurlin

10 Shelter From the Storm Bob Dylan

11 While My Guitar Gently Weeps The Beatles cover by Jake Shimabukuro

12 Spanish Bombs The Clash cover by Stockholm Syndrome

13 Fat Bottomed Girls Queen cover by Hayseed Dixie

14 The Night They Drove Old Dixie Down The Band cover by The Blue Rags

15 It’s Expected, I’m Gone Minutemen

16 Blind Willie McTell Bob Dylan cover by Josh Roberts


Thursday, April 16, 2009

Armature Wiring


A short video on how I add wire to the arms of the clay figure. There are better methods of doing this, but this was the easiest way for me.

You can find 22 Gauge floral wire at most hobby shops like "Michael's" "Hobby Lobby" "Hobby Bench" "Wal-Mart (craft section)" "Target (craft section)"

And if your interested, the music is from Rob McNurlin. You can listen and download for free here:

http://www.archive.org/details/rmcnurlin2004-07-30.flac16

Creative Commons License
Armature Wiring by Justin Bread is licensed under a Creative Commons Attribution-Noncommercial-No Derivative Works 3.0 United States License.

Tuesday, March 24, 2009

Green Screen Test


This was a pretty cool attempt at using Green Screens. The Green Screen here is actually just a $0.95 bright green poster board. You can buy these at hobby stores or Target/Wal-Mart.

Here's a link to where I got the stock footage of driving (it is free to share and to remix/edit). You can download it for free but you have to convert it to AVI format to use it in Wax.

http://www.archive.org/details/IMB_SF_R36_C10

The static at the end of the movie can be found here:

http://www.archive.org/details/Static_385

I also made the green screen footage available. You can download it here for free.

http://www.megaupload.com/?d=AKUO5790

If you edit this video you can post it to YouTube and post it as a response to my video.

Creative Commons License
Green Screen Test by Justin Bread is licensed under a Creative Commons Attribution-Noncommercial-Share Alike 3.0 United States License.

Tuesday, February 10, 2009

Motor Speaker Project


There's no practical use for this but it's a cool trick.

The reason this works is because both electric motors and speakers use electromagnets. A coil of wire is attached to a a piece of felt and placed over a fixed magnet. When electronics flow trough the coil, it creates a magnetic field and it repels against the fixed magnet which causes impulses. The felt also impulses which creates sound.

An electric motor works the same way except the coil of wire is attached to an axis that is between to fixed magnets. When electrons flow through and create a magnetic field, the two magnets repel the coil and causes it to spin. Then if you attached it to a cup, it converts the impulses into audible sound.

Try it. If you post a video you can add it as a response to this one.

Creative Commons License
Motor Speaker Project by Justin Bread is licensed under a Creative Commons Attribution-Noncommercial-No Derivative Works 3.0 United States License.

Quick Update

All of the previous blogs have been updated, so all the videos are operational. I haven't checked the links but if you find one that doesn't work, just let me know and I'll fix it.

Wednesday, January 14, 2009

I Return.

My original YouTube account got suspended for "violating the terms of use".

So at the moment, I'm trying to get it back together and reupload most of my old videos. I made a new account called aDimWit01.

http://www.youtube.com/user/aDimWit01.

Also, I need to re-embed the videos to all of the previous entries.

If you want to help, just tell people where my account hasbeen changed to. Anyway, for your enjoyment, I've sent up some custom players with several playlists containg music videos, DIY creative videos, Stopmotion videos, and My videos.


I think a lot of people would appreciate it if you could embed the Stopmotion Animations Playlist on your Websites.

Friday, December 5, 2008

Mini Guitar Amplifier


I made this little amplifier out of parts I pulled off of dead electronics so a more appropriate name would be a JunkAmp.

Here's a schematic I put together for people to reference. Download it by Right-Clicking then "Save as..." or "Save Link as...".

The image gets cutoff but just Right-click and "View Image" to see it all.


Here are the parts you will need.

LM386 Amplifier chip (8 pins)

10 ohm Resistor

10 microFarad (uF) Polarized Capacitor

220 microFarad (uF) Polarized Capacitor

0.047 microFarad (uF) Non-Polarized Capacitor

One Speaker: 8 ohm, 0.5 Watt speaker (I used a 8 ohm, 2 watt speaker in the video).

One 1/4 inch audio plug jack.

One 9 volt Battery.

One 9 volt Battery connector.

PCB Board

Wire. It's easier to use stranded wire, since it is more flexible.


Notes:

Polarized means there is a Positive and Negative end of the component. For the Capacitors, there is a white stripe on the side of the cylinder that leads from one of the leads (pin). That stripe indicates which side is Negative.

Since we are using a 9 volt battery for this project the Working Voltage of the Polarized Capacitors have to be higher than 9 volts, or else you will damage the Capacitor. The Working Voltage is usually written next to the White Stripe that I mentioned above and is just written as "9v" or greater.

The non-Polarized Capacitor does not have a polarity (+ -)so it doesn't matter which way it is positioned. Since the non-polarized capacitor is so small, the numbers on it will be written as "473" to indicate it's a 0.047 uF capacitor.


Edit: Jan. 17 2011

 I've gotten a few questions about adding additional features and so I drew up a second schematic that shows how to add an LED for an indicator light, Power switch and a volume pot.

lm386063

To add a little distortion, remove the 10 uF capacitor and replace it with a simple wire connecting Pin 1 and 8. The capacitor stabilizes the sound wave, but removing it will cause some distortion. Keep pin 1 and 8 connected though, this keeps the gain as high as possible.

If you have any questions, just email me at aDimWit@hotmail.com

Creative Commons License

Both images embedded on this post are Attribution-NonCommercial Creative Commons licensed.

Monday, December 1, 2008

Sound effects

I posted this as kind of a reference for other people who need sound effects. These are a few sites that people recommended and I use them occasionally too. To download stuff from the Planethalflife, you need a Gamespy account but it is all free.

http://editor321.planethalflife.gamespy.com/sounds.htm

http://www.findsounds.com/

http://flashkit.com/soundfx/

http://www.soundsnap.com/

http://sound-effects.com/

I hope these links help. If you have a suggestion, email me at aDimWit@hotmail.com and I'll add it to this post.

Weapon Review


I was hoping this video would answer a lot of questions about where I get the weapons and stuff like that. When I made this I thought a lot of these weapons were still available or easy to find on the net (the vast wasteland of information). But I, and a few other people, have had a lot of trouble finding some of these sets. I think the company that makes these guns releases a few sets a year, and releases them in limited numbers, so a lot of the guns I showed here might no longer be available. Luckily, there are still a few cool sets a available.

http://www.21stcenturytoys.com/

http://www.21stcenturytoys.com/buy.html

http://www.monkeydepot.com/

http://www.monkeydepot.com/product_p/usf0011-dd088.htm

http://www.monkeydepot.com/21st_Century_Toys_Modern_Modern_Russian_RPG_Set_p/usf0012-dd098.htm

http://www.monkeydepot.com/21st_Century_Toys_Police_Shotgun_Set_p/usf0008-dd080.htm

http://www.monkeydepot.com/21st_Century_Toys_US_WWII_30_Cal_Air_Cooled_p/usf0014-dd131.htm

http://www.monkeydepot.com/21st_Century_Toys_US_WWII_30_Cal_Water_Cooled_p/usf0013-dd129.htm

Note: Some of these links will probably go dead in a few months so tell me if they don't work for you.

Creative Commons License
Weapon Review by Justin Bread is licensed under a Creative Commons Attribution-Noncommercial-No Derivative Works 3.0 United States License.