Sunday, March 27, 2011

Graffiti


Someone pasted some pictures onto the walls of a rundown gas station near my house. I walked over their with my friend and we filmed and took a few pictures.

Obey, Andre, Man 02

Obey, Andre, Man 01

Obey, Andre, Woman 03

Obey, Andre, Woman 02

Obey, Andre, Woman 01

The video that appears in the clip is highly edited. If you want the complete footage, just email me at jbread89@hotmail.com and I'll find some way of making it available.


All images embedded on this post are Attribution-NonCommercial-ShareAlike Creative Commons licensed.

Friday, October 8, 2010

Guitar Hero Controller Synth


This is a modified Playstation 2 Guitar Hero controller. Just about everything is left the same with only slight modifications to the actual controller. The circuit that drives the oscillator is based on the LM386 amplifier chip. Here's the schematic. You can download the full image here.

Controller Schematic

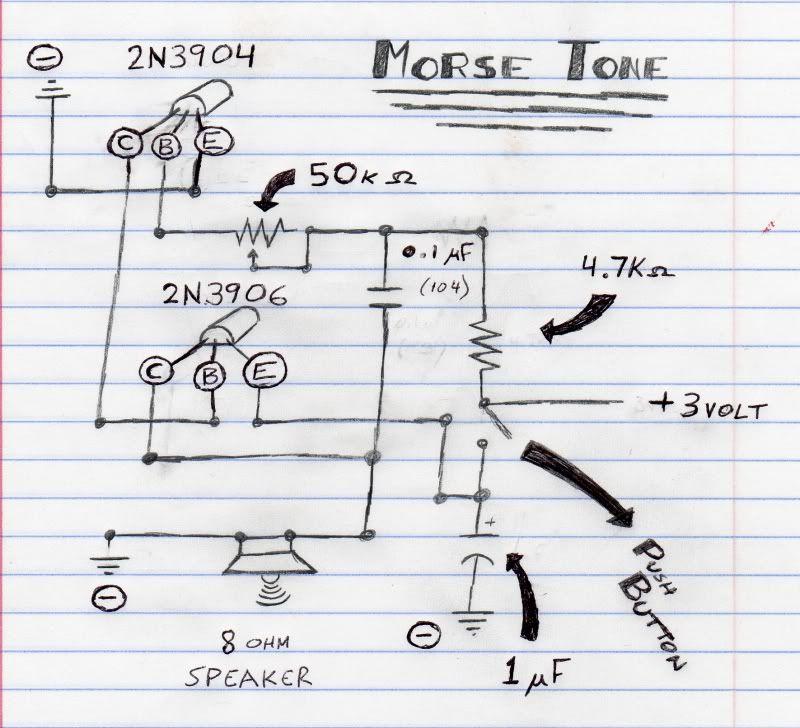
In this image, I actually inverted the resistors. The 50k ohm should be at the top and the 10k ohm should be at the bottom. That way, the lower tone is connected to the higher up keys and the higher tone is connected to the bottom keys, the way a real guitar is. Here is another picture which corrects this.

Controller Key Layout

Because of this layout, you still get a low tone if you strum without pressing a key because the potentiometer is also a resistor. When one key is pressed at a time, you will get a different tone but if you press two or more at a time, you will get a high tone. This is because the resistors will be connected in parallel. Here are a few photos of the key board along with the resistor board.

Controller Keys

Keys (Full View)

Resistor Key Tuner

Resistor Tuner (Bottom)

Resistor and Pot

The strum bar was a little tricky. I wanted to use an entirely different board because I was worried that the components on the board would cause some kind of short circuit. I was unable to find a board big enough to fit across the strum bar so I ended up using the original board. I had to cut several traces to ensure the current from the square wave circuit wouldn't run anywhere else.

Strum Bar Mod

The switches are connected to the output jack. I also accidentally inverted the wiring here as well. I connected the Ground to the switches and the switches to ground rather than the signal to the output. This is okay if you use it on a small amp but if you using a real guitar amp, the Ground on the amp will replace the ground on the circuit, which would give a constant signal, and bypass the switches for the strum bar.

If you connect the output signal to the switches (like I was supposed to) you effectively disconnect the signal from the amp until the switches are pressed using the strum bar.

I hope this helps you out if you decide to make this. If you need any help or clarifications email me at adimwit@hotmail.com. Thanks.


All images embedded on this post are Attribution-NonCommercial-ShareAlike Creative Commons licensed.

Tuesday, September 28, 2010

Stand Off


This took me one long weekend to complete. I used a digital camera that shot HD stills and used the HD video plug-ins for Windows Movie Maker. 

The filming and editing process for this video was fairly easy but I ran into a lot of problems making the first-person binocular view scene. I had used a green screen for the black binocular scope and filmed the video in full zoom. This worked great in theory but I had trouble formating the videos to work properly. The video only filmed in 640, but the pictures were in 1920 (or something like that). So I had to try to format them to the same size. I spent hours trying to do this but each time the video was corrupted or couldn't convert. I assume it was because of the codecs, which hadn't dawned on me until just now (idiot). Eventually, I just reformatted the black green screen image and used that over the 640 film, which is why in that scene the binocular view looks really small.

Anyway, I hope you enjoyed the little short.

Square Wave Oscillator


This is a square wave oscillator (digital, like 8-bit music). It's based around the LM386 amplifier I.C., which is what the mini guitar amplifier was based on. It has a simple power switch connected to the battery, a potentiometer for adjusting the tone, and a normally closed momentary switch. The momentary switch is connected to the signal output. It's normally closed so when you press it, the signal is cut off but when you release it, the signal passes through again to your amplifier. This can create some cool sounds.

I have the schematic embedded below. Feel free to download it here. There is detailed instructable I wrote here on how exactly to build the circuit.

LM386 Oscillator Schem1

This is a diagram showing the components wired to the I.C. The red x's indicate places where the wires don't connect and the black dots indicate connections. Feel free to download the image here.

LM386 Oscillator Schem2

This second video contains another square wave oscillator but with keys to jump to different tones and a potentiometer to adjust the overall tone. The keys are actually normally closed momentary switches. A resistor is connected to each switch so when it is pressed, it generates a tone. It's hard to explain here so I'll try to explain it later or in a video.

Creative Commons License
Square Wave with Keys by Justin Bread is licensed under a Creative Commons Attribution-NonCommercial-ShareAlike 3.0 Unported License.


Both images embedded on this post are Attribution-NonCommercial Creative Commons licensed.

Unpublished Material


A short collection of stop-motion projects which were never published. These projects were eventually abandoned for whatever reason. The date they were created ranges from 2004 to 2009.

iPod Battery Replacement


I had purchased a 60 GB iPod at a yard sale. It wouldn't turn on and it wouldn't hold a charge when it was connected to a USB port. With a firewire cable, it would charge but only run for 30 minutes as opposed to 8 hours. So I bought a battery for it online. This was a short clip showing how to replace the battery.

The iPod also had a couple other problems. The click wheel wouldn't work, so I had to replace that as well. After that, it worked great but I hated the iPod interface. After a couple days, I put Rockbox on their.

Rockbox was great. There were tons of features added to the iPod. You can record audio, run tons of audio formats, even a few video formats and lots of games.

Eventually, the five year old hard drive burned out so I shelved the iPod. I could buy a new harddrive but they're about $90 bucks so I'll wait awhile.

Friday, January 29, 2010

Morse Tone Generator


I slapped this together in about an hour or so. I found it on Instructables by user frickelkram.

http://www.instructables.com/id/Morse-tone-generator-low-power-CW-beeper/

It's a cool setup with some transistors in there to keep the power usage low. I never used transistors before so I had a little trouble figuring out how to wire it all up. Once I got it, I drew up a schematic that made it all kind of obvious.


The picture shows how the pins are laid out (double check your datasheet to see if it matches). The schematic symbol kind of confused me a little. So I drew it as my transistors looked just so I could get it straight.

Creative Commons License